Embed event calendar
Overview:
You can use the "Custom calendar" function to embed your events or our entire event calendar on your own website. With just a few clicks, you can create a code that you can insert into the HTML code of your website.
Embed directly with presets
Log in to Eventfrog with your account. On the left in the main navigation you will find the menu item "Own calendar". Here you can generate the code with which you can embed the event calendar or a selection of events on your website with just a few clicks.
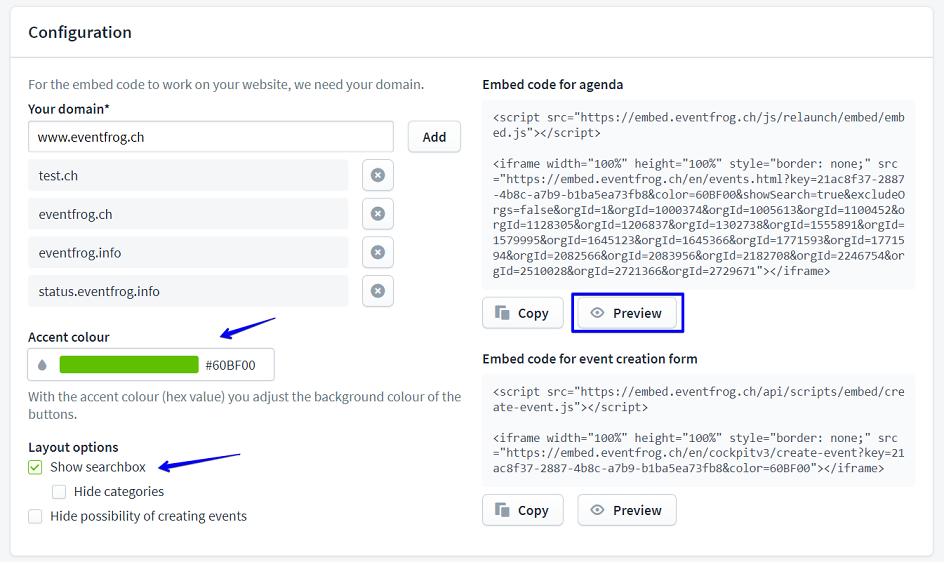
In the Configuration block, you will find the "Your domain" field on the left. This field is mandatory. It is important to enter the domain so that the code for embedding works correctly on your website. You can embed the calendar on several websites. It is important that they are included in the list of your domains.
Under "Your domain", enter the URL of your website. Confirm this URL by clicking "Add". You can also use this function to add multiple websites. If you want to show the event calendar on several subpages of your website, the main URL is sufficient.

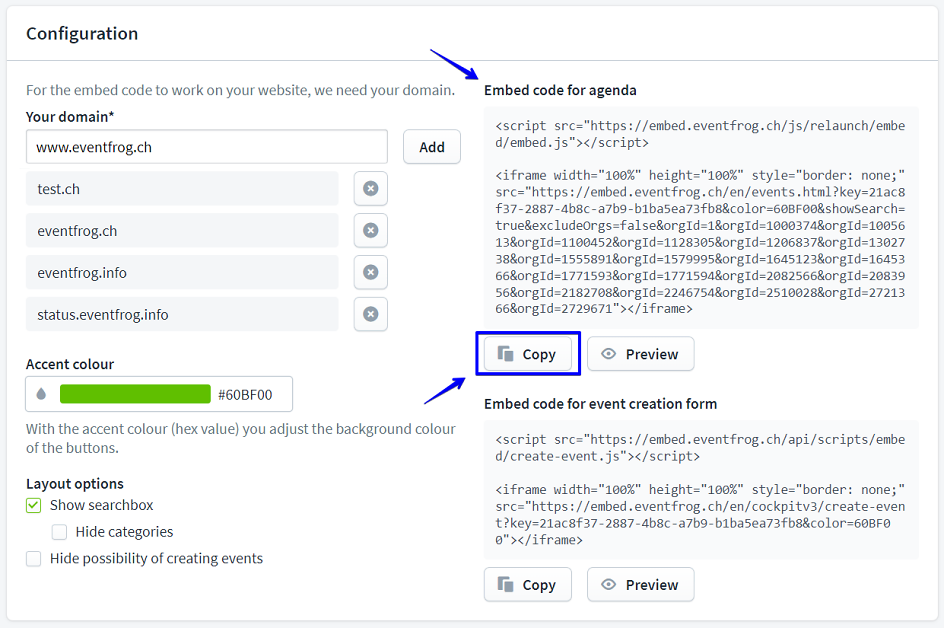
You can already export the calendar by inserting the code for embedding it into the HTML code of your website.
Current settings for your event calendar:
- You are registered as "Organiser". Your events will be displayed automatically.
- The "Eventfrog green" is used as an accent colour.
- A search box is displayed in the calendar, which your website visitors can use to search for events.
- The event entry form is displayed when you have inserted the code for it.
You can find out how to expand or change these default settings in the next paragraph.
Note: Many CMS use different URLs for the preview and edit mode than for the website itself. Therefore, it may happen that the embedding is displayed as an error in the preview, but works correctly when saved.
To avoid this, you can also register the domain of the edit or preview page with us.
I followed the instructions, but it still doesn't work - what can I do?
Note for websites created using modular systems such as wix.com or other CMS (Content Management Systems):
If your website was created using a modular system such as wix.com, the code cannot be pasted directly into this form. The following instructions will ensure that you can embed the code into your website:
- Copy the code into a Word document or other text editor.
- Open the desired page on your website in edit mode.
- Click 'Add' in the editor.
- Scroll to 'Embed' and select 'Embed'.
- Click on 'Embed widget' and select 'HTML code'.
- Copy and paste the embed code from Eventfrog into the box and confirm.
Set event selection for the calendar
As already described, the event selection is preset. You can also recognise this by the green settings wheel next to the "Organiser:inside" button.
To expand the selection of events displayed, make further settings in the "Configuration" area. This allows you to create your calendar according to the desired criteria. If you tick the "Include my hidden events" checkbox, events that are hidden in the Eventfrog calendar will appear in your calendar.
For example, you can display events in your calendar according to these criteria:
- Event categories
- Organiser
- Locations
- By search term
- Location plus radius
- Period

Select event categories
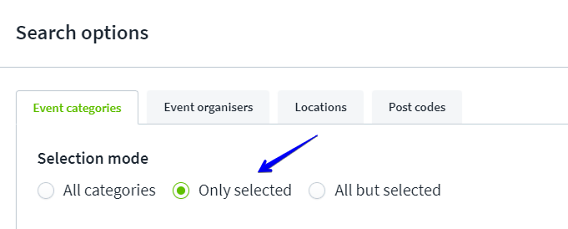
Under the "Event categories" menu item, you can use the "Selection mode" to determine which event categories are displayed in your calendar.
"All categories" is the default setting. This means that all event categories are imported and appear in your event calendar.
Restrict rubric selection
If you select "Selected only", the list of categories that you can select appears. In this case, no event categories are preset. Tick the categories, e.g. "Classical & Opera" or "Concert", that you want to include in your calendar. Click on the "Save" button at the bottom right to accept the selection.
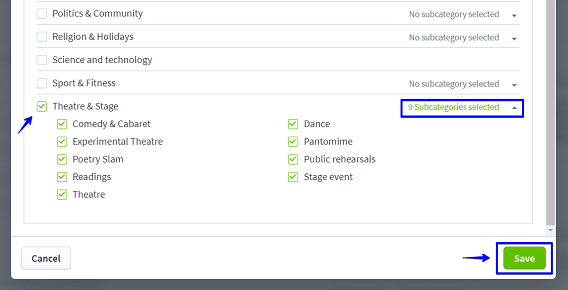
Select or exclude subcategories
If you have selected a category, you will be shown how many subcategories are available for this event category. You can click on "X subcategories selected" to view these. If you select a specific category, all subcategories are automatically included. If you want to exclude certain subcategories, deselect them by removing the tick next to the respective subcategory. Click on the "Save" button at the bottom right to accept the selection.
Select and add organiser
The default setting for "Organisers" is "Selected only". This means that you are selected as an organiser along with your events. You can use the "Search" function to manually find and add additional organisers. By selecting "All organisers", you can add all organisers.
Exclude individual organisers
If you want to exclude events from certain organisers from your event calendar, add them via the "Search" under "Selected only". Then select "All, except selected" to exclude exactly these organisers and their events. Please note that all organisers will be listed in the event calendar, except those you have excluded.
Set locations
Under the "Locations" menu item, you can select which locations are displayed in your calendar.
The default setting is "All locations". With "Selected only", you can search for specific locations using the "Search" function. You select the desired location by clicking on it. It will then be added to the "Selected" list.
Exclude locations
Under this menu item it is also possible to exclude certain locations. Add the event locations to the "selected" list and select "All, except selected". This way, all locations will be imported, except the ones you have excluded.
Limit event selection
Show events by search term
You can enter and select a term in the "Search term" field. Your calendar export will then display events that match this term or contain it directly.
Filter events by location
By entering a location in the "Location" field, you can specify the location where the listed events must take place. For example, if it is a region, e.g. events in and around Olten, you can extend the search radius.
Select time period for events in the calendar
The current default setting is "All dates". You can, of course, also specify a different time period.
If you click on "All dates", a menu appears with suggestions that you can select. Alternatively, you can select "User-defined" at the bottom of the menu and enter the start and/or end date on the right-hand side of the calendar display. If you click directly in the calendar display, the period automatically changes to "Custom". This allows you to determine the period via the calendar.
If you click on the "Reset (My events)" button, the selection is reset. All your events will be imported again.
You confirm your selection by clicking on the green "Apply" button.

Customise calendar display via configuration
Adjust the colour of the calendar
You can match the colour of the calendar to your website.
To do this, click on the colour area under "Accent colour". There you can select the correct tone via the colour spectrum or enter the hex value for the desired colour tone. Click on "Apply" to confirm the colour.
You can display a preview of your future calendar at any time using the "Preview" button, which you can find under the box with the embed code.
Select calendar display
Set your calendar under "Display options".
If you tick the "Show search box" box, a search field will also be created for your calendar. Your website visitors can use the field to search for and find events in your calendar. By ticking the "Hide categories" box, you can prevent categories and headings from being displayed in the search field, which can be used to filter the search.
If you tick the box "Hide event entry option", the event entry form will be hidden. So that your website visitors can enter their events in your calendar, you must integrate the "Code for integrating the calendar" as well as the "Code for integrating the event entry form".
