How do I create my own coupons or ads on tickets and can I monitor redemption?
Want to reach ticket buyers directly with discount offers or targeted advertising?
With Eventfrog, you can place custom coupons and small adverts directly on your tickets – perfect for highlighting offers, boosting revenue or increasing brand awareness.
This article will walk you through how to create and design coupons and ad spaces step-by-step – and how to monitor their redemption.
Overview:
What options do you have?
You can create up to six coupons or ad spaces per event. These will appear directly on the ticket – both in the digital version (app, PDF) and on printed tickets.
The following settings are available:
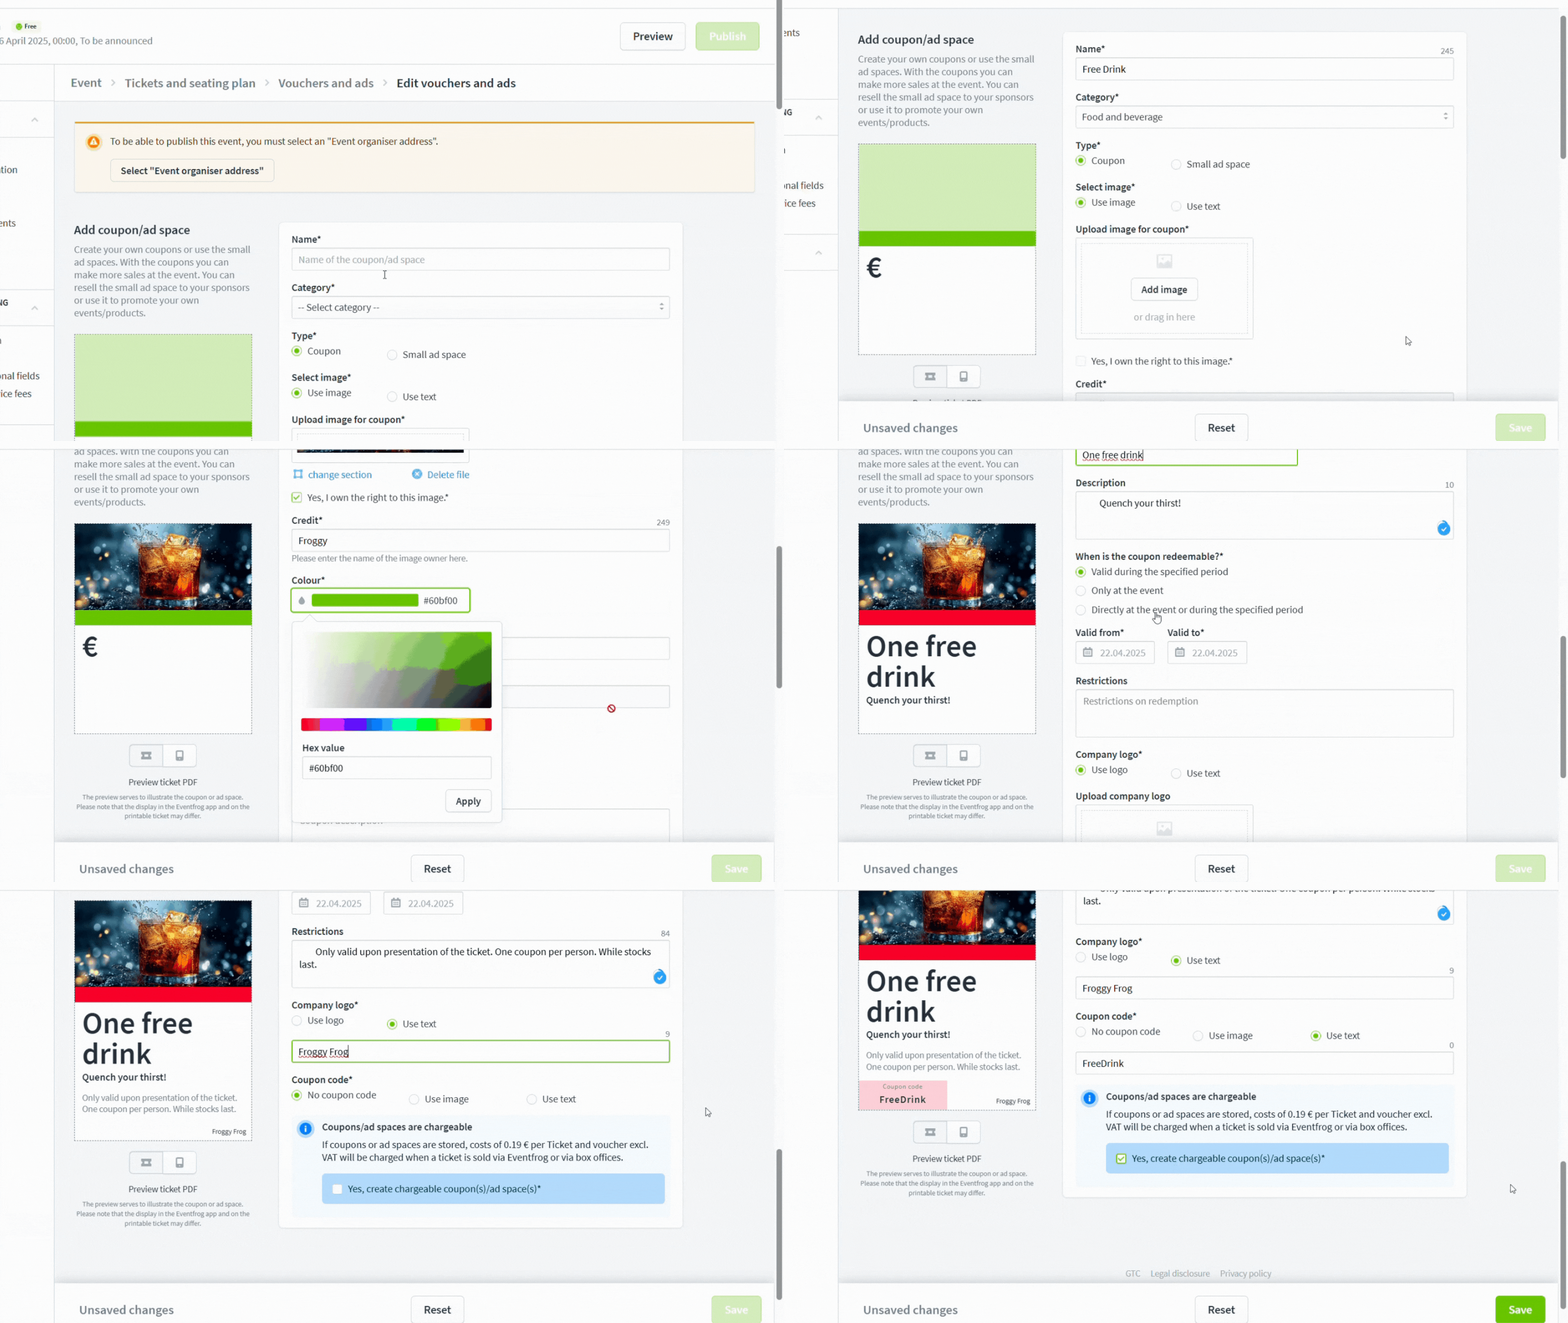
- Select a category (e.g. Food & Drink)
- You can add an image (format: 62 x 30 mm) or a text header
- Adjust the colour using a colour scale or by entering your HEX value (e.g. #95C11F)
- Insert a website link
- Choose the discount format: EUR, %, or custom text (e.g. «3 for 2»)
- Set a validity period using the calendar
- Add restrictions (e.g. «only one coupon per person»)
- Choose whether to include a logo (format: 276 x 135 px) or just text
- Add a coupon code as an image or text
- A live preview of your settings will appear on the left-hand side
- Optionally, you can upload a full branding image for the coupon (format: 62 x 85 mm)
Step-by-step: How to create your own coupons
1. Open the desired event in the Cockpit
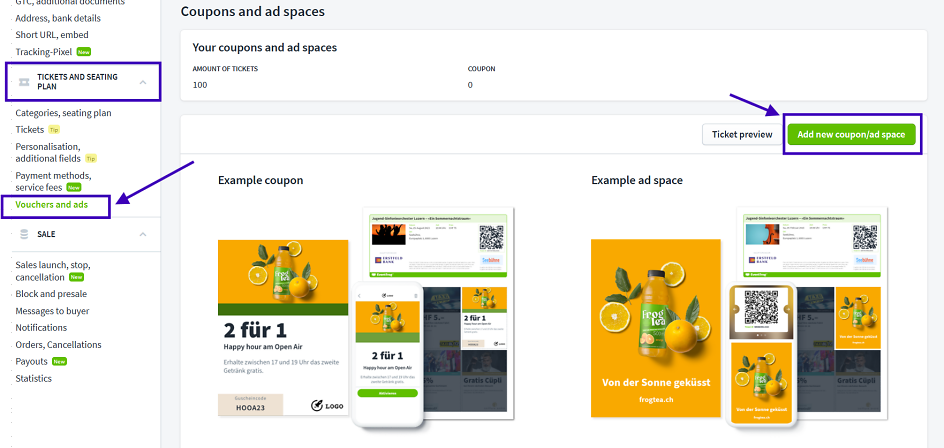
2. Go to «Tickets and Seating Plan» > «Vouchers and ads»
3. Click on «Create new coupon/Ad Space»

4. Select Coupon as the type.
5. Enter a name and choose a relevant category.
6. Decide whether you want to use an image or just text.
7. Adjust the colour of your coupon.
8. (Optional) Insert a link.
9. Set your discount (e.g. 10 %, 5 CHF, „3 für 2“).
10. Define the validity period.
11. Add any terms & conditions (e.g. «only valid when presenting the ticket»).
12. Upload your logo or enter your company name as text.
13. (Optional) Add a coupon code (image or text).
14. Confirm the paid creation.
15. Save your coupon and create more if needed.
👉Cost: 0,19 CHF (excl. VAT) per sold or reserved ticket.

Step-by-step: Designing an ad space
1. Open the event in the Cockpit.
2. Go to «Tickets & Seating Plan» > «Coupons & Ad Spaces».
3. Click on «Add new Coupon/Ad Space».
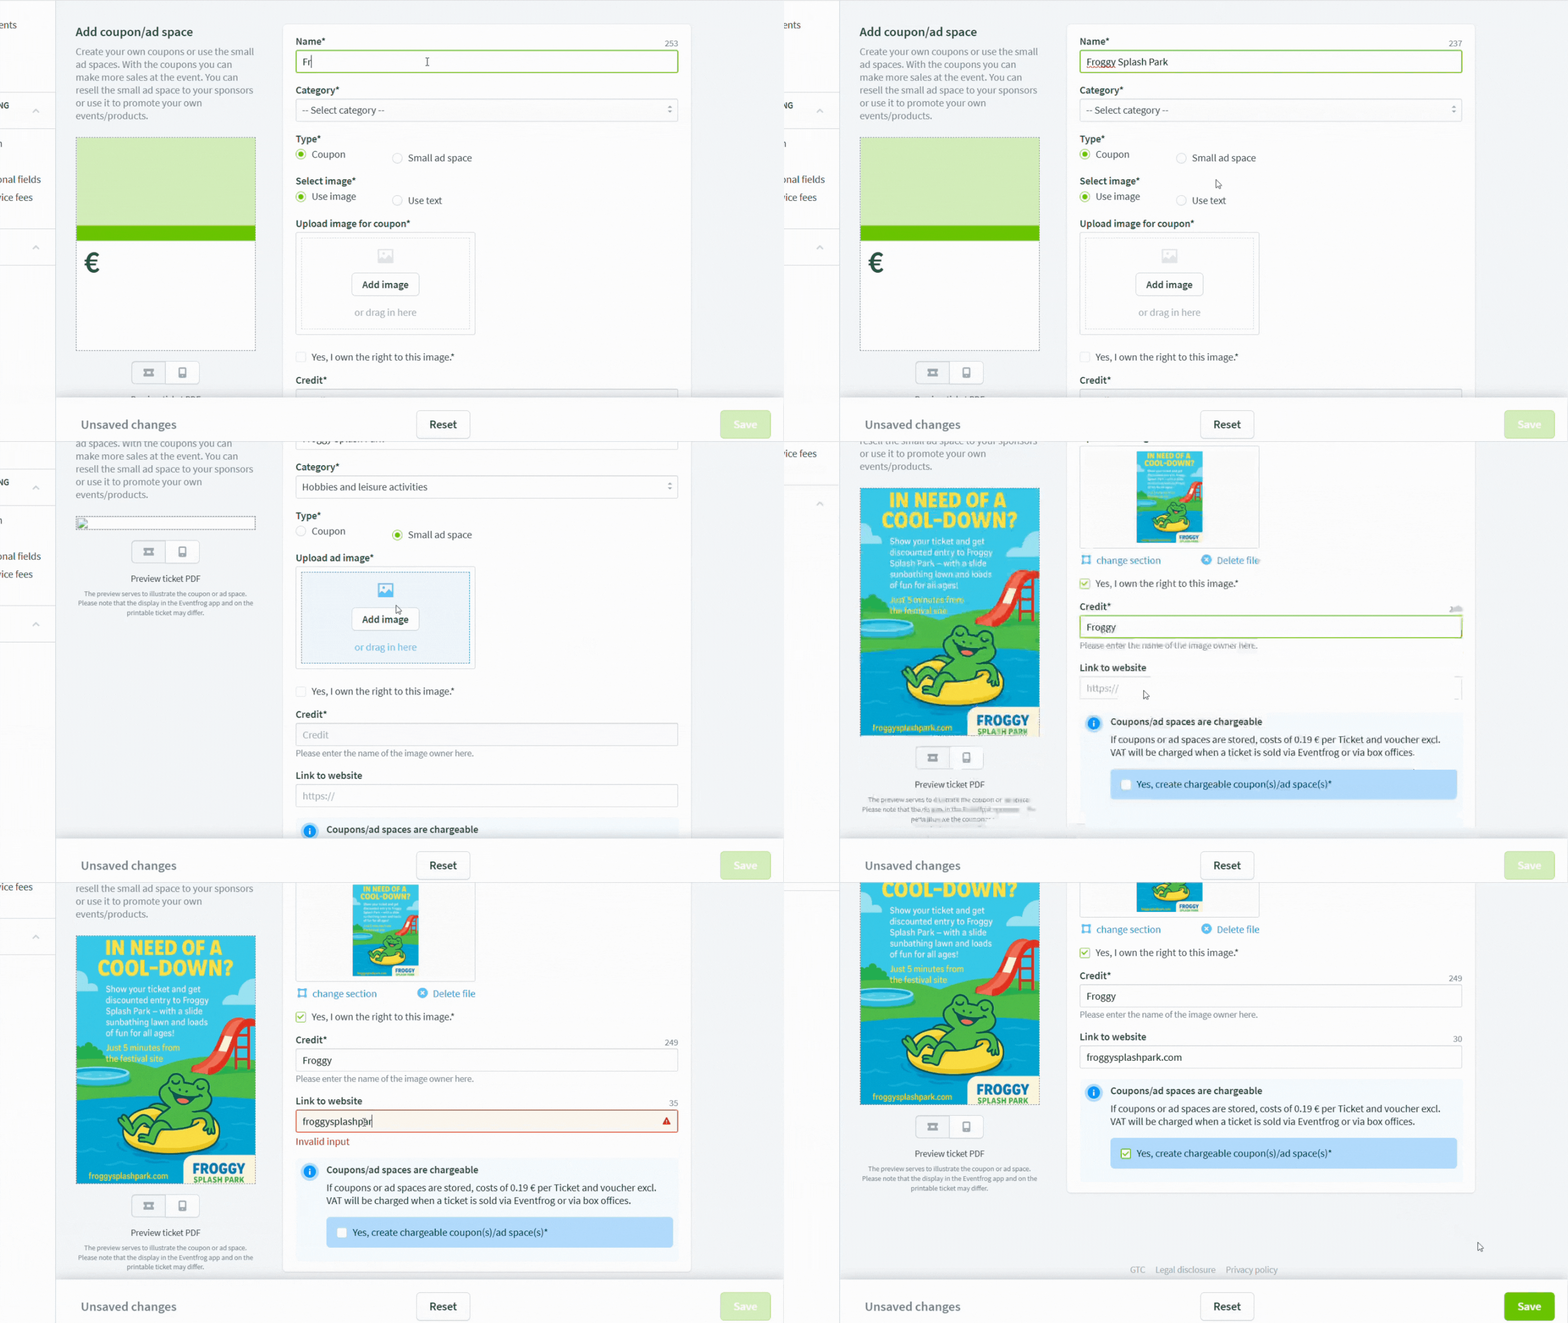
4. Select «Small ad Space» as the type.
5. Enter a name and choose a category.
6. Upload an image (min. 552 × 764 px).
7. Provide the image source and confirm image rights.
8. Check the preview.
9. Confirm the paid creation.
10. Save your ad space.
👉 Cost: 0.19 CHF (excl. VAT) per sold or reserved ticket.

Preview of coupon and ad space
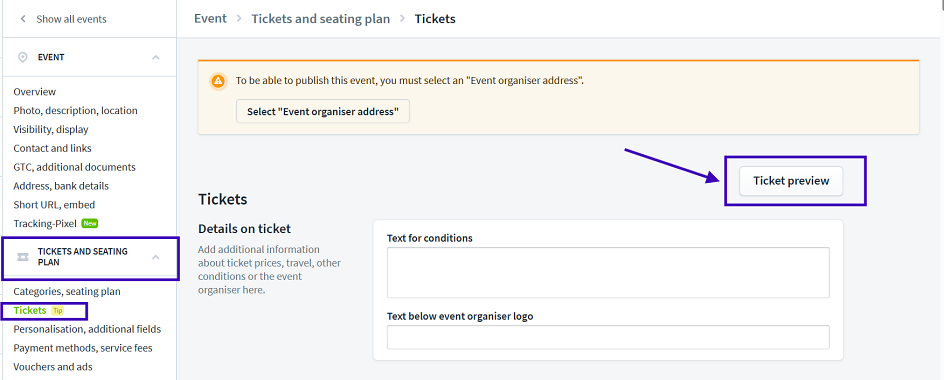
To check how your coupon or ad space will appear on the ticket:
-
In the Cockpit, go to «Tickets and Seating Plan» > «Tickets».
-
Click «Ticket preview» in the top right.
-
In the preview you’ll see:
-
At the top: the actual ticket with QR code
-
Bottom left: your coupon
-
Bottom right: your ad space
-

How to redeem and check coupons directly at your event
If your coupons are meant to be redeemed directly at the event (e.g. for a free drink), you can easily verify them using scans at the entrance or at the bar.
Here’s how it works:
- Create a checkpoint for entry, for example «Admission».
This allows you to check access to the event as usual. - Set up an additional checkpoint for each coupon, such as «Drink Coupon».
This enables you to see whether a coupon has already been used. - Assign both checkpoints to all ticket types.
Each ticket can then be scanned exactly once at each checkpoint.
To allow staff (e.g. at the bar) to check coupons:
Appoint a trusted person to log into the Eventfrog Entry app.
This person can select the correct checkpoint and grant access to additional team members, allowing scans on multiple devices.
Coupons redeemable in online shops
- Use one-time codes that can be limited by the shop (e.g. one per account, or limited redemptions)
- Include a note like «while stocks last» on the coupon
Coupons redeemable on-site via third parties
If your coupon is meant to be redeemed in-store with a partner – e.g. at a bookshop – there’s unfortunately no technical way to prevent someone from using it more than once.
To keep things fair:
Clearly state conditions such as:
- «Only while stocks last» or «One per person only».
- Ask the cashier staff to collect printed coupons and tick them off on a simple tally sheet.
- Once the predefined limit is reached, additional coupons can be declined
Super important:
Always mention that the coupon is only valid in combination with a ticket or QR code.
It doesn’t matter if it’s on a phone or printed – both ticket versions use the same QR code and can be scanned equally.
Tips for using coupons effectively
Always make sure your coupons don’t result in a loss – they should help increase your revenue.
Some solid ground rules:
- Structure your discount in a way that you still turn a profit
- A high redemption rate is usually a good sign – it means your offer is hitting the mark
- Set an expiry date and add meaningful conditions, e.g.: «Valid for purchases over 100 CHF»
That way, your promotion works in your favour – and offers value to your audience.


