
How do I create and edit a seating plan?
Overview:
How do I create a seating plan?
You can create your seating plan directly during event creation. You can also create and edit it at any time in the Cockpit. Open the event you want. Then go to «Tickets & seating plan». In the section «Categories and seating plan» click «Add seating plan». The seating plan designer will then open.
Note: For larger seating plans we recommend completing event creation first. Then create the seating plan in the Cockpit.

What settings are available in the seating plan?
In the seating plan designer you can choose different elements. For example standing areas. Seating. Tables. You can add them to your seating plan. You can assign each element to a category. You can move it. Rotate it. And name it. You can set how many spaces an element has. You can also set how they are arranged. You can number seats in different ways.
How do I assign a category to each element?
Click the relevant element. A settings window will open. Click «Category» in this window. A selection with your previously created categories will appear. Select the relevant category.
You can change the colour of the element at any time. Go to the relevant category in the section «Categories». Then go to Options > Appearance.

How can I show a stage in the seating plan?
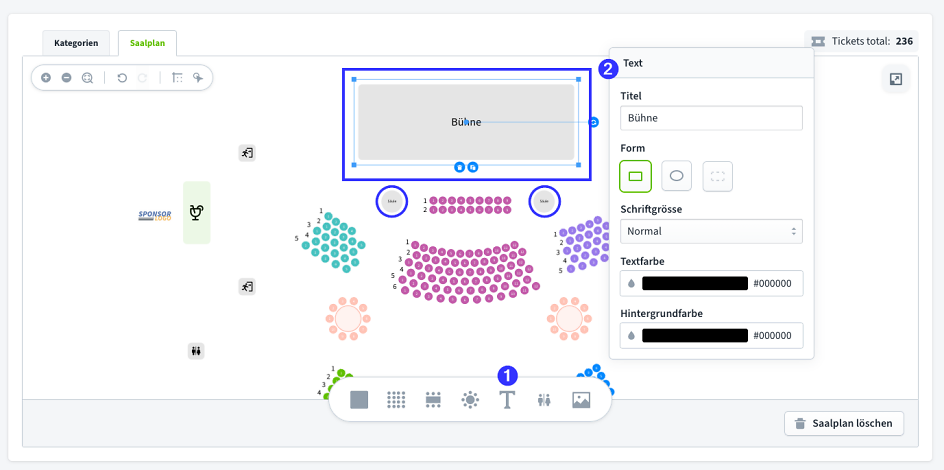
For special elements such as a stage. A bar. Or pillars. You can select the text element. You can name it. Colour it. Shape it. And place it freely. For an even clearer display you can also add the stage icon. Or upload your own image of the stage.
How can I delete an element in the seating plan designer?
Click the relevant element. A blue button with a bin icon will appear below the element. Click it. Then confirm with «Yes delete».

Which seating plan settings can I still change after publication?
After publication you can no longer make changes to the seating plan. You can find an overview of all possible changes before and after publication here >
How do I create the seating plan step by step?
Go to «Tickets & seating plan». In the section «Categories and seating plan» click the button «Add seating plan». The seating plan designer opens. You can use it to create your seating plan.

Now click the button «Add seating plan» to create the seating plan you want.

In the seating plan designer you can choose different elements. For example standing areas. Seating. Tables. You can add them to your seating plan. You can assign each element to a category. You can move it. Rotate it. And name it.
Add free seating
With the element «Free seating» you can create different standing areas for a concert. You can use this function as follows:
1. Click the element «Free seating». Then drag it into the editing area. Click the element in the editing area. A settings window will open. You can make different settings there.
2. Set the title of the element. For example «Sector B».
3. Add a label. For example «VIP area». This label will be visible to ticket buyers in the seating plan.
4. Adjust the font size of the label if needed.
5. Select the matching category that you have already created. For example the category «VIP area».
You can make and adjust these settings for all elements. If you copy an element the settings are copied too.

Create seats
With the element «Seats» you can create different seating areas for an event. You can use this function as follows:
1. Click the element «Seats». Then drag it into the editing area. Click the element in the editing area. A settings window will open. You can make different settings there.
2. In the tab «Info» you can select a seat orientation. You can set the title. You can select the matching category. You can define the number of rows. And the number of seats per row.

3. In the tab «Numbering» you can make the following settings:
- You can define the start number for rows and seats. Enter the numbers you want.
- You can define the numbering increments for the seats.
- You can select the numbering direction.
- You can define the numbering behaviour.
- You can define the numbering type and row label.
- You can select whether the row should be shown on the ticket or not.

4. In the tab «Shape» you can shape the seats freely. You can make the following settings:
- You can change the basic shape.
- You can adjust the curve and the angle.
- You can define the rotation.

Show tables
With the element «Rectangular table» or «Round table» you can create different table areas for an event. You can use this function as follows:
1. Click the element «Rectangular table» or «Round table». Then drag it into the editing area. Click the element in the editing area. A settings window will open. You can make different settings there.
2. In the tab «Info» you can set the title and the matching category for the element. You can define the number of seats along the length and width. You can also decide whether you want to sell individual seats or the whole table only.

3. In the tab «Numbering» you can define the start number of the seats and the numbering direction.

4. In the tab «Shape» you can define the rotation of the element.

Edit individual seats
With the function «Select individual seats» you can edit individual seats within a row or at a table. This is targeted and flexible. You do not need to adjust the whole element. You can use the function as follows:
1. Click the cursor icon at the top left to activate selection mode. Then select the seats you want.
2. In the settings field you can now change the category of the selected seats.
3. Alternatively you can remove the selected seats from the row or table.

Removed seats can be restored at any time.
1. Click the parent element. This can be seats or a table. Open the tab «Deleted» in the settings window.
2. In the list select the restore icon for the seat you want. This will add it back to the row or table.

Insert text
With the element «Text» you can create text elements for the seating plan. For example «Stage». You can use this function as follows:
1. Click the element «Text». Then drag it into the editing area. Click the element in the editing area. A settings window will open.
2. In the tab «Text» you can define the title of the element. You can also make different settings there. For example shape and colour.

Place icons
With the element «Icon» you can visualise specific areas in the seating plan. For example WC. Exits. Or bar. You can use this function as follows:
1. Click the element «Icon». Then drag it to the position you want. Click the element in the editing area. A settings window will open.
2. In the window you can choose between different icons. You can also make settings such as shape. Size. And colour.

Upload images
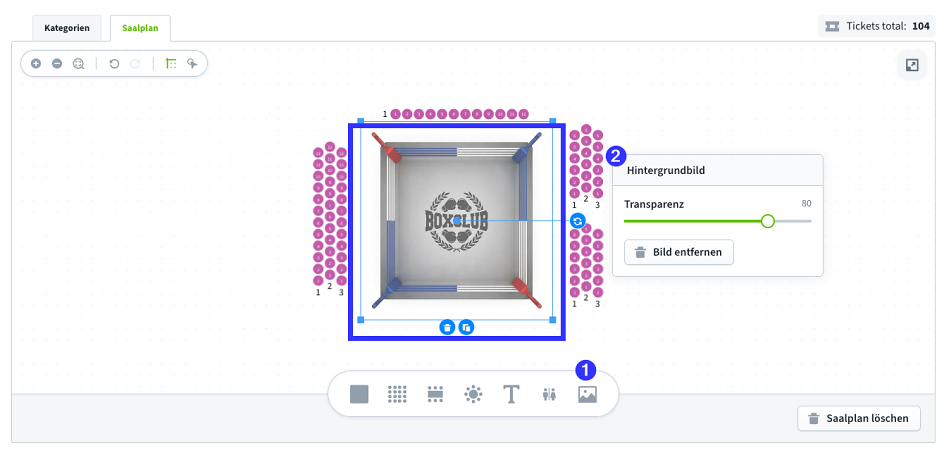
With the element «Background image» you can upload your own images or graphics. This helps you visualise your seating plan individually and realistically. For example a venue floor plan. Your own stage graphic. Sponsoring logos. Or other graphic elements. You can use this function as follows:
- Click the element «Background image». Then upload an image from your device.
- Place the image at the position you want in the seating plan. Adjust the size and transparency as needed.